
মাইক্রোসফট উইন্ডোজ ১০
উইন্ডোজ ১০ হচ্ছে মাইক্রোসফট উইন্ডোজ অপারেটিং সিস্টেমএর সর্বশেষ সংস্করণ। এটি উন্মোচিত হয় ২০১৪ সালের ১৪-ই সেপ্টেম্বর এবং ২০১৫ সালের ২৯ জুলাই এটি মুক্তি পায়।মুক্তির প এক বিবৃতে বলা হয়,এর পর মাইক্রোসফট আর নতুন কোনো অপারেটিং সিস্টেম উন্মোচন করবে না । উইন্ডোজ ১০ এর জন্য নতুন আপগ্রেড প্রদান করে তা আরোও উন্নত করবেস প্রোগ্রামও বলা হয়।
পৃথিবী বিখ্যাত সফটওয়্যার নির্মাতা প্রতিষ্ঠান মাইক্রোসফট। মাইক্রোসফট এর তৈরী করা “উইন্ডোজ” অপারেটিং সিস্টেম পৃথিবীর প্রায় ৯৫% কম্পিউটার এ ব্যবহার করা হয়। এই উইন্ডোজ এর সর্বশেষ সংস্করণ হচ্ছে “উইন্ডোজ ১০”।অনেকের মনে প্রশ্ন যাগতেই পারে উইন্ডোজ ৮ বের হল এর পর উইন্ডোজ ৯ গেল কোথাই তাহলে! উইন্ডোজ ৮ এর পরবর্তী সংস্করণ হিসেবে উইন্ডোজ ১০ এর ঘোষণা দিয়েছে প্রতিষ্ঠানটি। প্রতিষ্ঠানটি ঘোষণা দিয়েছে যে উইন্ডোজ ১০ পর আর কোন নতুন সংস্করণ, যেমন “উইন্ডোজ ১১” বা “উইন্ডোজ ১২” বা এ জাতীয় কিছু আর তৈরী করবে না। তাই উইন্ডোজ ১০ ই হচ্ছে মাইক্রোসফট এর তৈরী করা শেষ অপারেটিং সিস্টেম। তারা শুধু সময়ের সাথে সাথে উইন্ডোজ ১০ কে উন্নত করে যাবে। উইন্ডোজ ১০ এর সব শেষ সংস্করণকে বলা হয় windows 10 Anniversary update. এটার built in version হলো 1607. আর পুরনো windows 10 এর built in version ছিলো 1511.
উইন্ডোজ ১০ আগের যে কোন সংস্করণ এর থেকে কম ত্রুটি যুক্ত। উইন্ডোজ ৭/৮/৮.১ এর থেকে হার্ড ডিস্ক এর কম স্পেস দখল করে। আগের সব সংস্করণ থেকে ফাস্ট এন্ড স্মুথ।ts দ্রষ্টব্য)।
উইন্ডোজ ইন্সটল করার জন্য আমাদের সবার আগে উইন্ডোজ ১০ ডাউনলোড করতে হবে, অথবা আশেপাশের দোকান থেকে উইন্ডোজ ১০ এর সিডি কিনেও উইন্ডোজ ইন্সটল করতে পারেন।
এখানে ৩২-বিট এবং ৬৪-বিট দুইটা অপশন আছে। যাদের র্যাম ২ জিবির ওপরে তারা ৬৪-বিট এবং যাদের র্যাম ২ জিবি এর নিচে তাদের জন্য ৩২-বিট সংস্করণ উপযুক্ত।
এখন ইন্সটল দুই উপায়ে করতে পারেন, দোকান থেকে কেনা সিডি থেকে অথবা আমার দেওয়া ডাউনলোড লিঙ্ক থেকে ডাউনলোড করাটা দিয়ে পেনড্রাইভ এর মাধ্যমে।
Windows 10 beginners guide
Windows 10 Interface

The Windows 10 screen offers the following main features:
- Start button—It’s back! As with Windows 7 and most earlier versions of Windows, the Start button appears in the lower-left corner of the screen, and you click it to display the Start menu.
- Start menu—The new Start menu is divided into two sections. On the left is a navigation section that gives you access to your user account; your most frequently used apps; system features such as File Explorer, Settings, and Power; and the rest of your apps (via the All Apps command). On the right is a scaled-down version of the Windows 8/8.1 Start screen that offers quick viewing and access to the tiles (see the next item) of a few apps.
- Tiles—The rectangles you see on the right side of the Start menu each represent an item on your PC—most tiles represent apps, but you can also add tiles for folders and websites—and you click a tile to launch that item. Tiles can appear in one of four sizes (see “Resizing a Tile,” later in this chapter).
- Live tiles—Many of the Start menu tiles are “live” in the sense that they display often-updated information instead of the app icon. For example, the Weather tile shows the current weather for your default location; the Mail tile displays recent email messages; and the Calendar tile shows your upcoming events. Note that these tiles don’t display any live content until you have used them at least once.
- All Apps—Clicking this icon displays a complete list of the apps and desktop programs installed on your PC. Click Back to return to the main Start menu.
-
User account—Clicking this icon gives you access to several account-related tasks accessing the Accounts section of the Settings app, locking your PC, and signing out of your account.
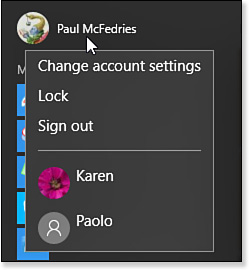
Figure 4.2 Click your user account tile for quick access to some account features and commands.
- Desktop—Relegated to a mere “app” in Windows 8/8.1, the desktop is back in Windows 10 and resumes its (rightful, in our opinion) place in the main interface as the default location for programs and documents.
- Taskbar—This strip along the bottom of the screen displays icons for each running app. You can also pin an app’s icon so that a shortcut to it remains in the taskbar even when the app isn’t running.
- Search box—You use this box to search your PC. We’ve found that this feature is the easiest way to launch apps, settings, and documents in Windows 10.
- Task View—Click this taskbar icon to display thumbnails of your running apps and to create virtual desktops (see “Working with Virtual Desktops,” later in this chapter).
- Pinned apps—The Windows 10 taskbar comes with several pinned apps, which means those icons remain on the taskbar even when the apps are closed. To learn how to work with pinned apps, see “Pinning an App to the Taskbar,” later in this chapter.
- Notification area—This part of the taskbar displays various system icons for features such as networking, sound, and power, as well as the notification issued by Windows.
Navigating Windows 10 with a Touch Interface
We used to always say that Windows was built with the mouse in mind. After all, the easiest way to use screen elements such as the Start menu, the taskbar, toolbars, ribbons, and dialog boxes was via mouse manipulation. However, for tablet PCs that come with no input devices other than a touchscreen, it’s now safe to say that Windows 10 was built with touch in mind. That is, instead of using a mouse or keyboard to manipulate Windows 10, you use your fingers to touch the screen in specific ways called gestures. (Some tablet PCs also come with a small penlike device called a stylus, and you can use the stylus instead of your finger for some actions.)
What are these gestures? Here’s a list:
- Tap—Use your finger (or the stylus) to touch the screen and then immediately release it. This is the touch equivalent of a mouse click.
- Double-tap—Tap and release the screen twice, one tap right after the other. This is the touch equivalent of a mouse double-click.
- Tap and hold—Tap the screen and leave your finger (or the stylus) resting on the screen until the shortcut menu appears. This is the touch equivalent of a mouse right-click.
- Swipe—Quickly and briefly run your finger along the screen. This usually causes the screen to scroll in the direction of the swipe, so it’s roughly equivalent to scrolling with the mouse wheel. You also use the swipe to display some of the Windows 10 interface elements: Swipe up from the bottom edge of the screen to display the taskbar, swipe right from the left edge to open Task View, and so on.
- Slide—Place your finger on the screen, move your finger, and then release. This is the touch equivalent of a mouse click and drag, so you usually use this technique to move an object from one place to another. However, this is also ideal for scrolling, so you can scroll an app vertically by sliding your finger up and down on the screen, or horizontally by sliding your finger right and left on the screen, making this technique the touch equivalent of clicking and dragging the scroll box.
-
Pinch—Place two fingers apart on the screen and bring them closer together. This gesture zooms out on whatever is displayed on the screen, such as a photo.
NOTE
If you don’t see the Touch Keyboard icon in the taskbar, tap and hold the taskbar to display the shortcut menu, and then tap Show Touch Keyboard Button.
- Spread—Place two fingers close together on the screen and move them farther apart. This gesture zooms in on whatever is displayed on the screen, such as a photo.
- Turn—Place two fingers on the screen and turn them clockwise or counterclockwise. This gesture rotates whatever is displayed on the screen, such as a photo.

